Tuesday, June 30, 2009

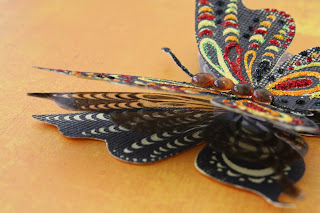
3-D Butterfly

This is my newest layout of my second daughter Cleapatra. She just turned 10 this month. She's my nature girl. She loves ladybugs, flowers, shells and animals. She's shy, very polite and oh so lovable. I love you Clea!!!


This tutorial is about making this cute little three dimensional butterfly.


I used a Basic Grey acrylic stamp (any medium sized stamp will do) and StazOn ink. I stamped the butterfly image twice on card stock and once on a transparency.


After the ink dried I stickled (or glitter glued) the card stock image with four colors. Then added Robins Nest dew drops for the butterfly's body. Once it's all dry cut the image out.


Cut out the other card stock and transparency image. On the back of the glittered and transparency butterflies add foam dots.


Now, you just layer....Glitter....transparency....cardstock.


Glue it down to your page. Let me tell ya...it looks so much better in real life.


Thanks for taking a peek.


~Angelica~

Sunday, June 28, 2009

ma mama = my mama


This is one of my most recent layouts. The photo was taken on my 31st birthday a few weeks back. Delilah is about 6 1/2 months here. Still has no hair!! The title is based on what I call her. Ma mama meaning my mama...the "my" just evolved to "ma".


Here is just some details of the pearl swirl I made once again. I'm totally addicted to making these things..lol!! I used black puff paint...worked like a dream!!


I made this butterfly from images that were forwarded to me. I just printed it out, cut it out, added puff paint and stickles. For the butterfly's body I used Robin's Nest dew drops.


For the frame, painted it the green color, then added crackle and over that black paint.
* The pp, frame and crystals came for the Swirlydoos July Kit Summer Sorbet

Saturday, June 20, 2009

Pearl Swirls Tutorial

This is my first tutorial, please bare with me. Many of you have been asking how I make these pretty swirls. So, this is for you!


Supplies: Liquid Pearls or Puff Paint, scissors, exacto, transparency, original crystals or pearls scanner, glue dots


The first thing you have to do is scan the original crystals or pearls face down, print it out.


Place your transparency over the copy. It would totally help if you have a magnetic mat board, like Basic Grey's, to hold the transparency onto the paper. Otherwise you may have to keep realigning the dots.


This is the fun part...just follow the guide.


Try using different colors. This is what it looks like when done.


The trick is to cut reallllly close to the pearls. The less you see of the transparency the better.

For the middle sections carve out with an exacto knife


Then, just adhere to your page with glue dots. Voila!!!

Now, if you feel this is to time consuming, you don't have the products or patience let me know and I can custom make some for you.
Scrap on!!!

Friday, June 19, 2009

I'm a blogger

So, it took me about a year to get this blog up and running. I kept thinking that is was going to be so hard to do. Hmmm....not so bad. Now that it's up I plan on posting my scrapbook layouts with techniques and loads of stories about my ever lovable kids. And maybe, every once in awhile, things about me...lol!! If you know me I hate to talk about myself. I'm more of a listener. An introvert...but with this blog I have hopes to change that!! Enjoy!!