Sunday, April 27, 2014

Burlap Butterfly Tutorial

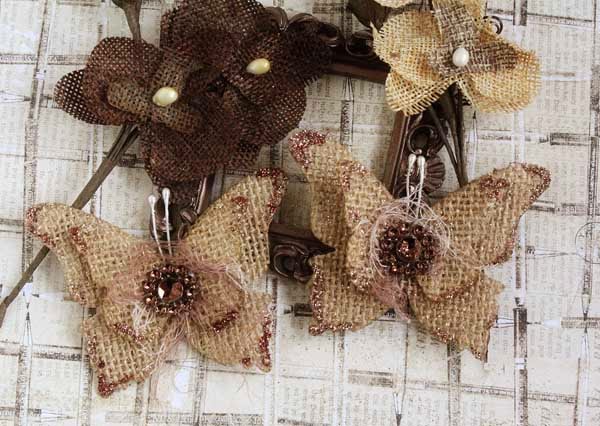
Hello all! I wanted to share this quick and easy tutorial on making your own burlap butterflies. The March Swirlydoos Kit, Salutations, has some pretty unique burlap flower sprays. So, I  thought to match I would try my hand at making my own butterflies.
 
You can get burlap by the yard at any craft store.  Here I cut out a 8 x 8 square.
 Step 1:
To make the burlap stiff cover in Modge Podge. Let it completely dry. I think you can use a fabric stiffener spray,  but I just used what I had on hand.

Step 2:
I used a die cut for my butterflies. You can also hand cut with a template.
 Step 3:
For a little more pizzazz, I took some cheese cloth and sprayed with Glimmermist. Let dry. Set aside
 Step 4:
For the antennas take floral stamens and bend in half. Ink them up for a darker shade.
 Step 5:
Glue to the larger butterfly
 

 Step 6:
Layer the smaller butterfly on top

Step 7 :
Add the cheese cloth
 Step 8:
Add your center piece.

Step 9:
Using glossy accents as an adhesive sprinkle on some glitter. The will also aid in keeping the edges from fraying.


Here is the finished butterfly! Totally fast an easy!!
 
Here is layout I made using the butterflies. I added gesso to go with the paint on the layout.

Friday, April 25, 2014

2nd Reveal with Swirlydoos Tiffany's Kit

Happy Friday, friends!! Today I'm sharing two more projects I made using the Swirlydoos April Kit, Tiffany's. 
 
First up is the chipboard frame that came in the Main Kit. I painted it with black gesso and stippled on some bead gel medium for texture. Once it was dry I used the Prima Chalk Edger that came in the Embellie Kit and dabbed it in random areas. Then, I took a Distress Stain in Brushed Pewter rubbed it on lightly. I really love the effect of all the texture and layers on the bare chipboard. I made the flower on the lower left using the awesome Bloom Tool and crepe paper that came in the Tech kit.
 
Here is a close-up of the texture.
 
My second project is a layout. I love working with layers. So, a great tip I like to use it foam dots. Lots and lots of foam dots. I even layer the foam dots on top of each other for more dimension.
 
 You can find both butterfly sets, Azura and Deep Teal at my LittleScrapShop on Etsy.
 
Thanks for taking the time!

Saturday, April 12, 2014

Swirlydoos Reveal and Blog Hop

Welcome to:

April Scrapbook Kit Reveal & Blog Hop!
 
If you came here from Maggi's blog, then you are on the right track. If not, go back to Swirlydoos' blog and start from there. We have some amazing projects for you to see today !! Make sure to leave a comment on all of the blogs for a chance to win!!! Make sure you have LIKED & FOLLOWED Swirlydoos on Facebook!!!

Swirlydoos is proud to bring you our beautiful April collection:

Tiffany's
 
And check out these coordinating add ons that perfectly compliment our April scrapbook kit!
 
 
We have some absolutely beautiful scrapbook projects for you to see today !!  
 
The last week of March to the first two weeks of April is a pretty busy time for me. We have three birthday's and spring break. So, I wasn't able to jump right on this gorgeous kit. I just got to stare at it and do a little petting. Once I had two days free I was able to get these three pages done QUICK! Usually it takes me 3-4 days to complete ONE page. This kit was the easiest by far to work with! Everything just coordinated to perfectly! Plus, the colors....okay!?!?
 
My oldest daughter just celebrated her 16th birthday. I took her on your yearly photo shoot and just KNEW that this kit would compliment her lovely photos.
 This kit is so elegant and classy that I decided to go with a more playful approach for my second layout. I loooovvvee the black and white polka dot paper...and of course made matching butterflies that you can find HERE.
 This is my layout based on the sketch...although it looks way off!! LOL!! You know how it is? You start with a sketch and it takes a life of it's own. I used one photo instead of three small ones. And I had to use all that negative space. So, I used the Dusty Attic chandelier chippy....the inspiration for my Ambient Elegance Butterflies.
 Here is the monthly sketch
 
 
So, let's get started! Make sure to leave a comment on all of the blogs for a chance to win!!! 

You have until midnight, eastern time, on Sunday 4/13 to complete the hop. Winners will be announced on the Swirlydoos Blog on Monday 4/14. In order to qualify to win here is what you need to do:
1: Visit all of the blogs and leave a comment on each. This way we know you were there. Take your time. There are REALLY beautiful things to see along the way.
2: Before you leave each blog, look for the “special” words and write it down. 
Once you have visited all the blogs and collected all the special words, they will create a sentence. 
3: Finally, go back to the Swirlydoos blog and leave a comment letting us know how much fun you had, tell us the sentence that was created with all of the special words you collected. Can't wait to hear from you.


My special word is : IS

The party continues over at Paulien's blog. Have fun!


Tuesday, April 1, 2014

Graphic 45 Botanical Tea Book Box

One of the things I love most about being an Etsy Shop owner is the people! I've meet so many nice ladies that really appreciate what I do for them! But, in turn they do more for me! For that I am most grateful!!

I was commissioned from one of my amazing customers to make something that would hold goodies. She wanted it in the  Botanical Tea  Collection and have pockets, tags and notecards. I thought a book box would be the perfect thing! You can find the paper mache book boxes at any craft store. Once you get it painted you can do just about anything!
 
Here is the front cover, somewhat based off the cover of my mini album that I recently made. 
 
For the side I used some beautiful vintage lace from an lovely etsy store.....you can find the store HERE.
 For the box the look like it has pages, I used some molding paste and a plastic fork to make indentions.
 This is the inside of the cover. I made a pocket to hold all the tags. The butterflies are also from my Etsy Shop...you can find then HERE.
 This is the inside bottom, where I just placed the notecards for demonstration purposes.
 All the pretty tags and notecards. I love the look of seam binding, so yummy!
This is just the book open! Pretty! 
Thank you for taking the time! I always welcome custom orders! You can contact me HERE for any inquiries!

♥♥