Saturday, July 31, 2010

Reveal Day at Swirlydoos *Shabby Ambition*

Don't you just LOVE Reveal Day at Swirlydoos???!?!?! I know I do!!! But, you know what I love more......getting my kit in the mail!!!!!! Every month is like my birthday...lol!!!!!
The August Kit Shabby Ambition is absolutely gorgeous.

Baby Blues
I did a little "photoshoot" of my Delilah in a tutu. I'm still a total amateur at taking pictures but I'm learning. Also, I've been playing around with Photoshop...so be prepared to see a lot of altered photos. Please visit the Photoshop thread for lots of shared tips from the amazing swirly girls. There is soooooooooo much inspiration there.

I made the butterfly by printing on card stock, adding glaze then diamond dust. These are my most favorite butterflies.

I hot glued the trim around the photo. I painted the flourishes brown and used the brown smooch to do a bit of highlighting.


SHY
I LOVE the grays and blues of this page. And, of course, the photo of Delilah playing shy.

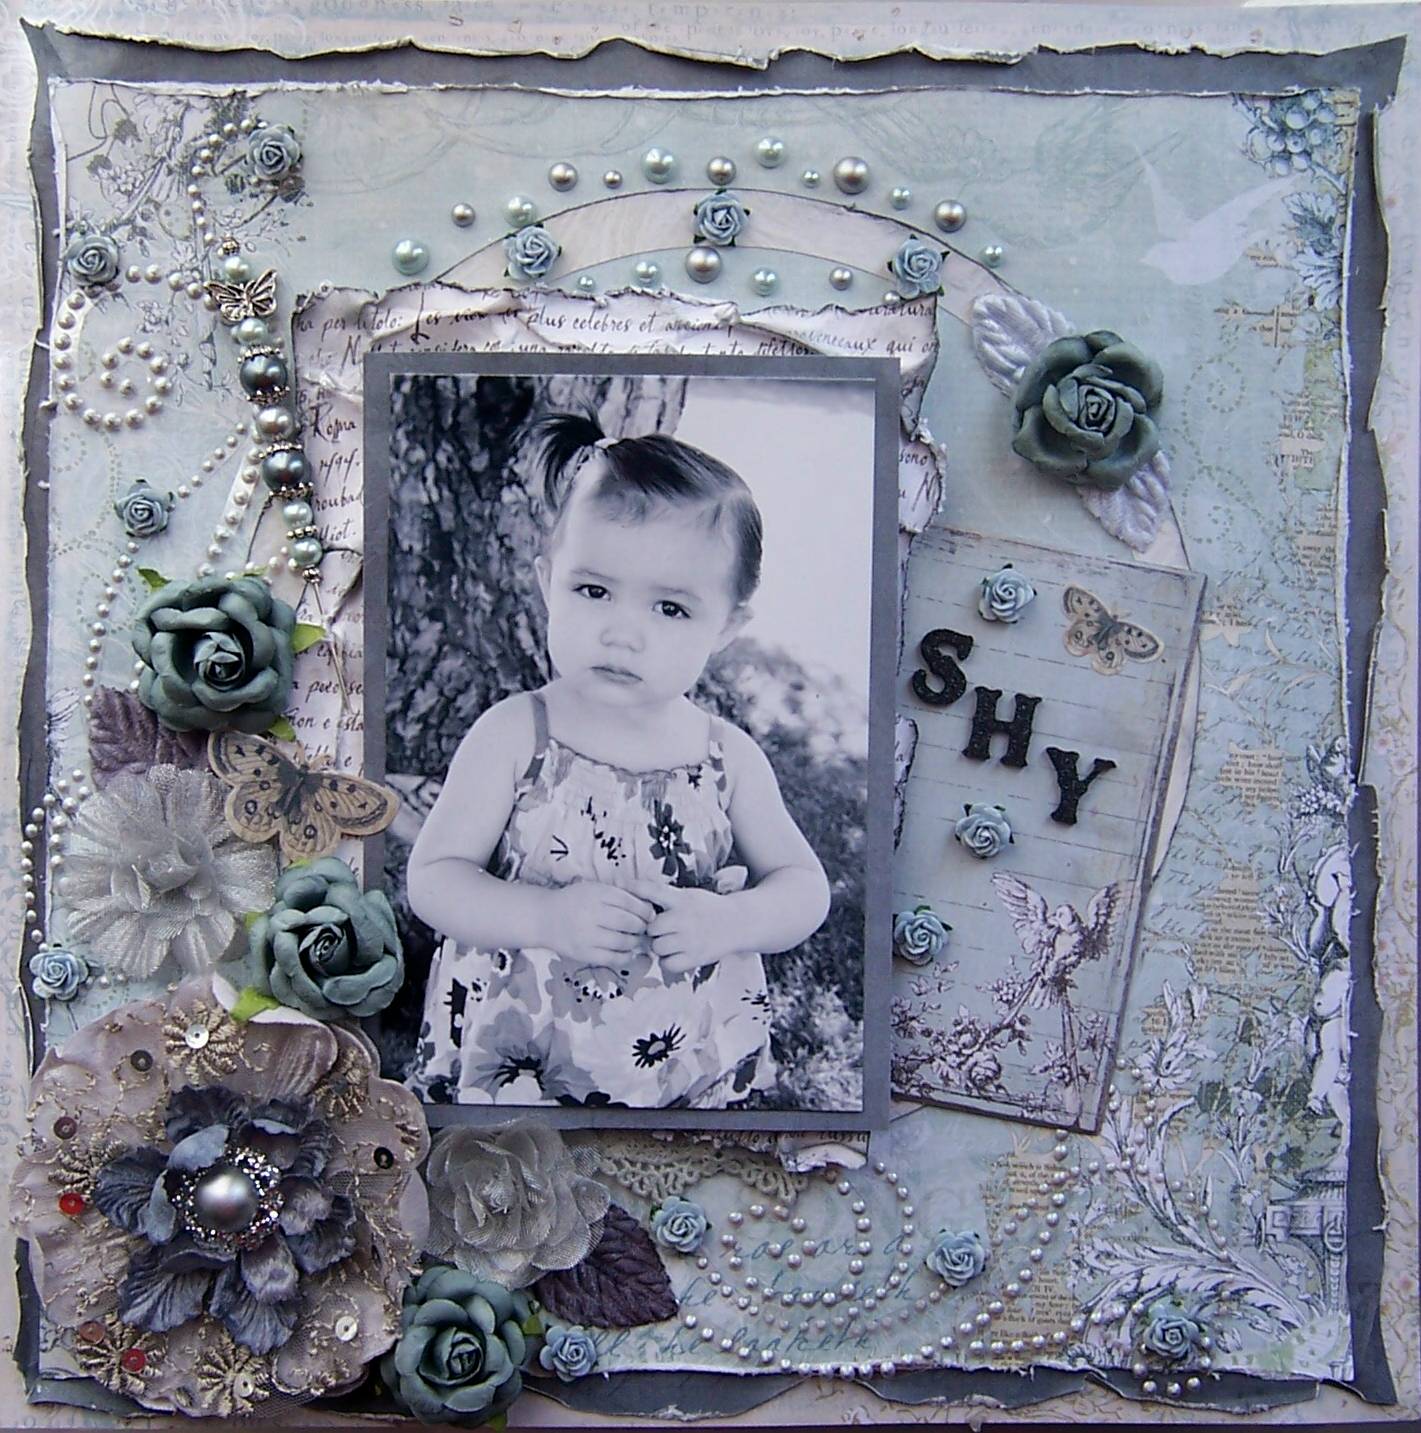
I made the flourishes with the Liquid Pearls that came in the embellie add-on. You can find my tutorial HERE on how to make your own flourishes.


You're a STAR
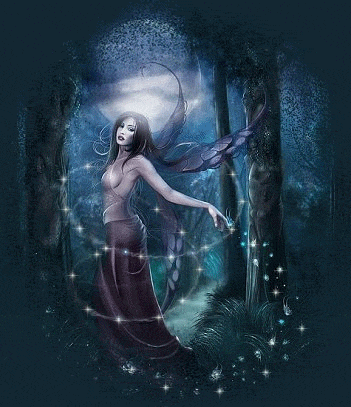
I wanted to go with a dark color scheme with this page because of the altered photo.

I painted the flourish with the Shimmerz paint that came with the kit.

Tranquil

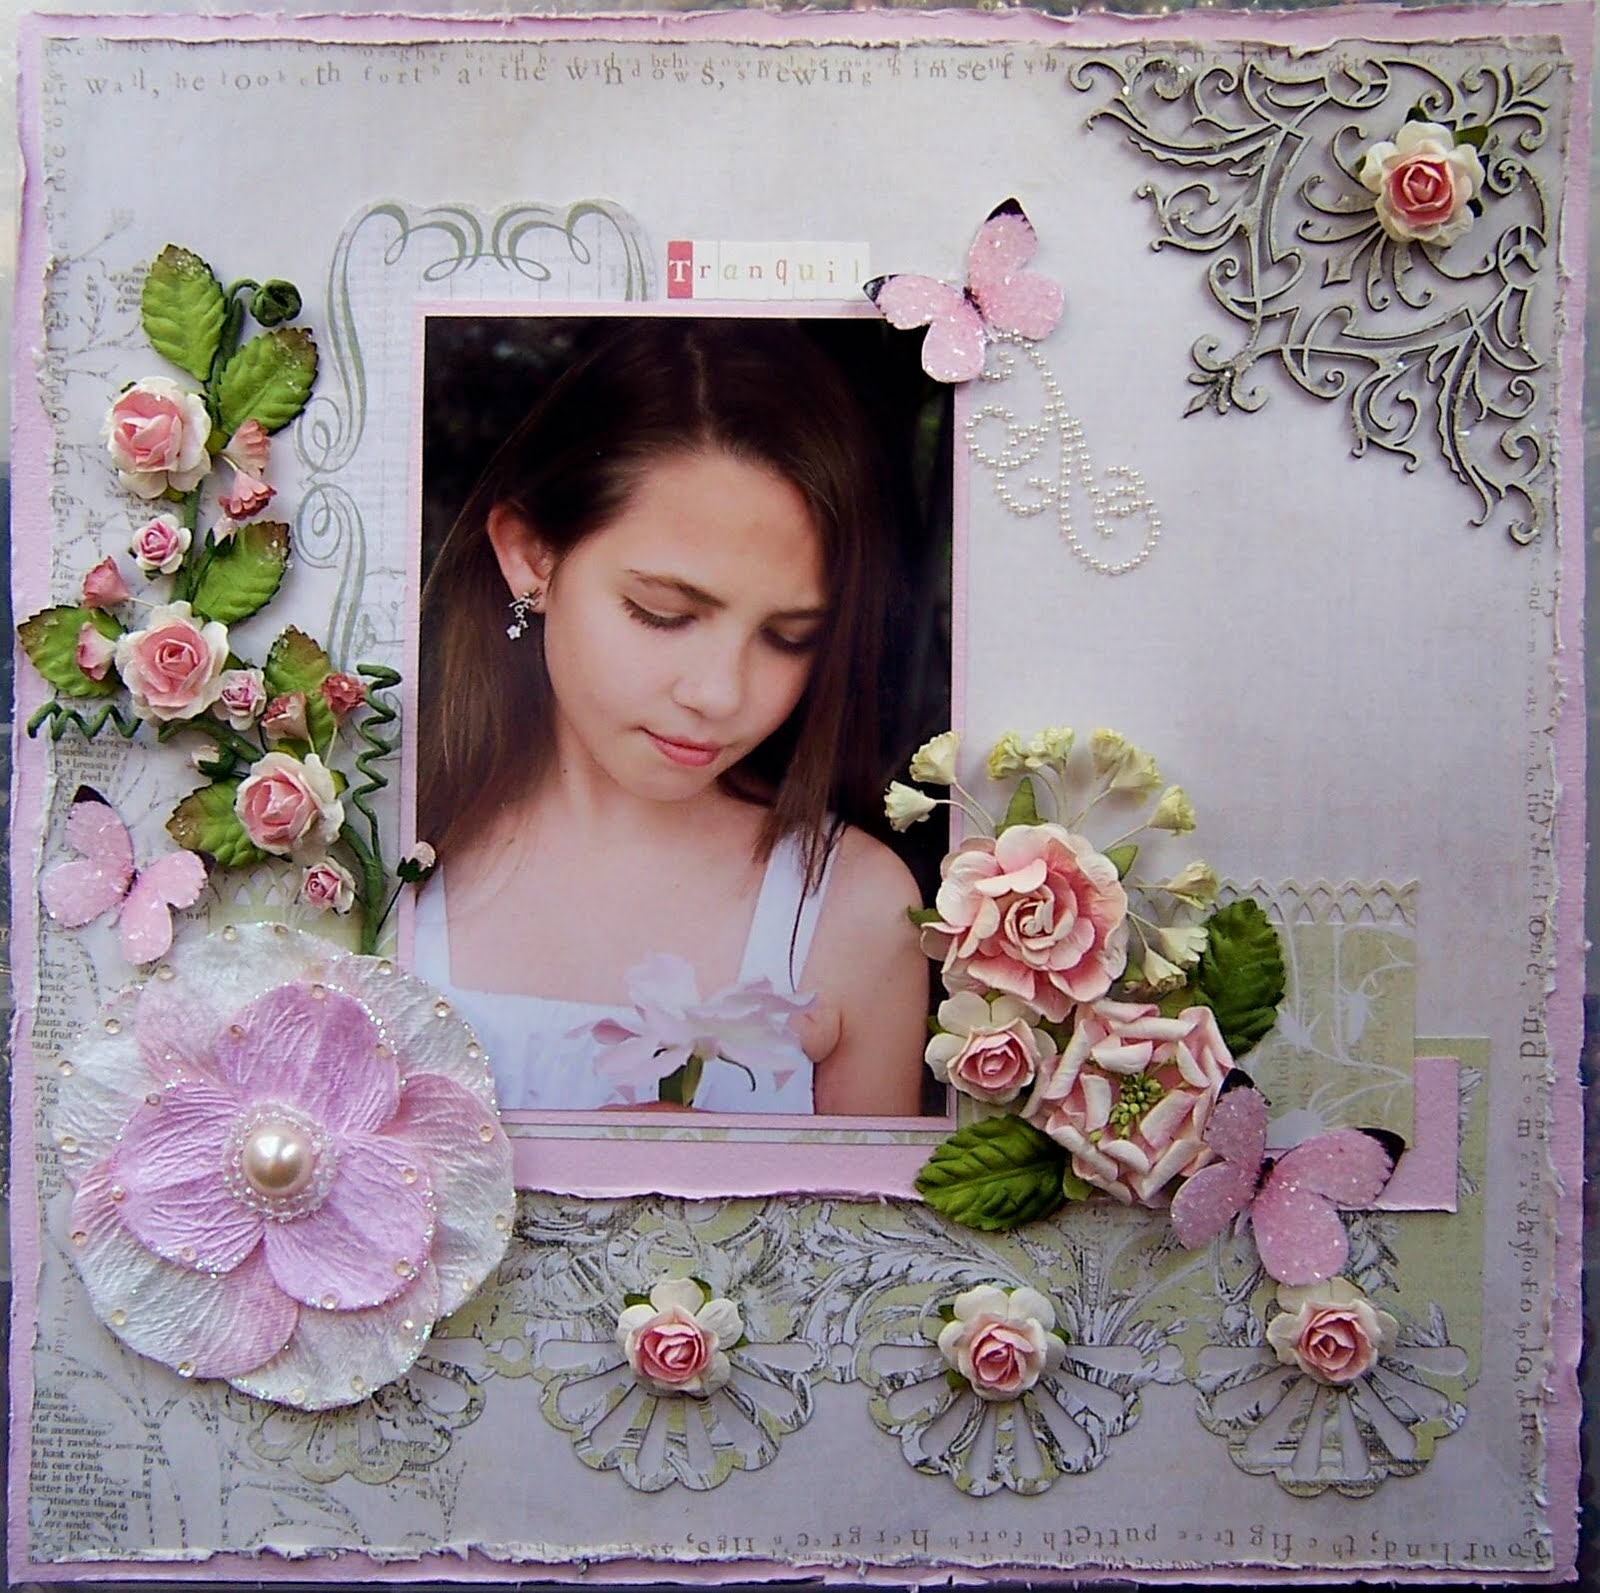
I'm so excited that my vines are featured in the Embellishment Add-on. I do have some extras in my Etsy Shop if you missed out. I added some Diamond Dust from the embellie add-on to the leaves and flowers.


That Look

More Diamond Dust....lol!!

Cute
This page is based on the monthly sketch by Begguna. The sketch is awesome. Though, I had a tad bit hard time with it because it called for 3 photos and I'm a 1 photo gal. Love the way it turned out.

I lightly colored the flourishes and added Diamond Dust....can you tell I love the stuff?!??!

Thanks so much for taking a peek. Be sure to stop by Swirlydoos to get your Shabby Ambition Kit!

Thursday, July 22, 2010

ZVA Creative's New CHA Releases

I wanted to share Zva Creative's new CHA Release. Lots of brand new blooms in beautiful color combos. And, of course their signature flourishes in lovely new designs. If you are attending CHA in Chicago be sure to stop by the Zva booth to take a peek of all their new lines.

Beautiful Baby

When I got my DT package in the mail I was in awe over the new paper blooms. They come in assorted color and sizes.

The new flourishes are a mix of pearls and rhinestones.

I love the new design of the leafy stem..prefect to match with the blooms.

World of Imagination

I tuck two of the new maple leaves behind the blooms

The is the large leaf stem in a gorgeous sage color.

A Perfect Day

I absolutely love the butterfly and trail flourishes. Also, a mix of crystals and pearls.

Another close-up of the awesome leaf stems. These are such a beautiful color.


Thanks for stopping by!!

Monday, July 19, 2010

ZVA Creative DT July BLOG HOP

The Zva Designers are joining together today to share a project that we have created using some of our favorite Zva Creative products. I am hoping that you will take some time to join us for a little bit of fun again this month!

The Blog Hop begins at
Kim Hughes' blog.
She will have the complete list of all blogs that are participating in
case there is a glitch along the way. If you would like to play along,
I am linking to one of the Zva designers and that designer is linking
to the next and so on. There are 19 design team members, so be prepared
to be inspired along the way. Hidden on 5 of the blogs is a Zva
Creative prize package ...YAY! Those blogs will be randomly chosen
after the hop is over, so it's important to leave a comment on as many
blogs as you can along the way.

This Blog Hop runs through midnight US Eastern Standard Time on Monday,
July 20th and the 5 winners will be announced on Wednesday, July, 21st
on each of the winning blogs and the full list will be found on Kim
Hughes‘s blog (linked above). We will do our best to notify each
winner, but it's best if you can pop in to all of the blogs once again
on Wednesday...plus, you never know what kind of inspirational creation
that you may find there. All you need to do is leave a comment on this
Zva Blog Hop post...you do not need to leave a comment on each and
every designer's blog post to qualify. The more times you leave a
comment along the blog hop path though, the more chances you will have
to be one of the lucky winners.


Please hop on over to see:

Ingrid Davers


Thank you SO MUCH for joining us

Wednesday, July 14, 2010

Angel Eyes **SWIRLYDOOS**

This another page using my Swirydoo's July Kit Summer Serenity. I just can't get over how beautifully this kit was put together.

I've scrapped this picture of Delilah before. It's my absolute favorite of her. I figured, I have four kids, I can scrap a picture 4 times if I really wanted.

Angel Eyes

I tried my hand at making my own Fiesta Flowers. I don't have the Tim Holtz Tattered Rose Die (if that's even what it's called), so I had to get creative. I cut different size flowers from my cricut. Then, I used some super old decorative scissors called Torn Page. I just snipped off the tip of the petals.

I ink the chipboard with distress ink . Then, used glossy accents to hold the Diamond Dust. I love the sugared look!!


Thanks for stopping by!


Thursday, July 8, 2010

Cabbage Rose Tutorial

I'm love making my own handmade flowers. I was playing around with a technique that Lisa did with making Fiesta Flowers. And came up with theses little cabbage roses. I think they kinda look like the ones from Prima.

So here we go.....
I went with the Retro punches because they have the circle end that is needed. So, I'm not sure how other punches would work.

Punch out 2 of each size flower.

Lightly mist your punches....

While damp, take a rounded pen cap and push and roll into a mouse pad to get a little pocket in the middle of the petal.

Pull the petals up just a bit and let dry....

Do this to all the flowers except 1 of the smaller punch.

With the second small punch squeeze to make a bud.

Now, just start layering your flowers. Large to small and alternating the petals.

You can bend and pinch to get the look you would like.

Put the bud in the center of the other small punch.

Here it is all put together.

Punch out 5 leaves for the Martha Stewart punch and pink the tips.

Freehand cut a circle smaller than your flower and glue the leaves around. Then, glue your rose on top.

This part is optional. If you have Diamond dust or glitter, put some Glossy Accents on the tips and dip your flower into the tub or sprinkle the glitter.

There you go....a pretty little handmade Cabbage Rose!!


Thanks for stopping by!!